
✅ What this guide will do:
- Create a root CA with an intermediate certificate
- Setup an ACME server for issuing server and client certificates
- Using the ACME server with Traefik for TLS encryption
- Setup client authentication with mTLS on all devices
❌ What this guide will not do:
- Store the private keys of the Root and Intermediate on a TPM (e.g. YubiKey)
- Configure an OCSP responder for certificate validity and active revocation
- Configure a RADIUS server to authenticate clients with a valid certificate
If you are using a distro that is not based on Debian you will need to lookup install commands and possibly build tools like Smallstep from source.
https://jamielinux.com/docs/openssl-certificate-authority/
First we need to make sure that openssl is in fact installed. Usually it should be but it’s good to check.
openssl versionNow, if you aren’t already, switch users to root. It’s best to use root for the ca files since files owned by root that also have tight permissions can only be accessed by root and no other process or user.
sudo su
cd ~
Now that we are in /root we can create a few files and folders we need for our CA.
# Folders for the Root CA
mkdir /root/ca
cd /root/ca
mkdir certs crl newcerts private
chmod 700 private
touch index.txt
echo 1000 > serial
echo 1000 > crlnumber

# Folders for the 1st Intermediate CA
mkdir /root/ca/intermediate
cd /root/ca/intermediate
mkdir certs crl csr newcerts private
chmod 700 private
touch index.txt
echo 1000 > serial
echo 1000 > crlnumber
With these commands we are creating folders for our root and our intermediate where we will store our certs, keys, CSRs, and our CRL. But right now we cannot create our certificates because we need an openssl.cnf. Actually we can but openssl will use the default config under /etc/pki/tls/openssl.cnf which is definitely not what we want.
First switch back to the /root/ca folder and download the openssl.cnf with wget there.
cd /root/ca
wget -O openssl.cnf https://derlev.xyz/blog/2024/homelab-pki/files/root-openssl.cnf
Now you can configure your CA to your liking.
You can enable certain subject fields like state, locality, organizational unit, and email and set defaults for them. You will need to uncomment these fields here and enable them in the signing policies.
[ policy_strict ]
# The root CA should only sign intermediate certificates that match.
# See the POLICY FORMAT section of `man ca`.
countryName             = match
#stateOrProvinceName     = match
#localityName            = match
organizationName        = match
#organizationalUnitName  = optional
commonName              = supplied
#emailAddress            = optional

[ policy_loose ]
# Allow the intermediate CA to sign a more diverse range of certificates.
# See the POLICY FORMAT section of the `ca` man page.
countryName             = optional
#stateOrProvinceName     = optional
#localityName            = optional
organizationName        = optional
#organizationalUnitName  = optional
commonName              = supplied
#emailAddress            = optional

# ...

[ req_distinguished_name ]
# See <https://en.wikipedia.org/wiki/Certificate_signing_request>.
countryName                     = Country Name (2 letter code)
#stateOrProvinceName             = State or Province Name
#localityName                    = Locality Name
0.organizationName              = Organization Name
#organizationalUnitName          = Organizational Unit Name
commonName                      = Common Name
#emailAddress                    = Email Address

# Optionally, specify some defaults.
#countryName_default             = your country (2 letter code)
#stateOrProvinceName_default     = your state or province
#localityName_default            = your town
#0.organizationName_default      = your org name
#organizationalUnitName_default  = your OU name
#emailAddress_default            = your email
If you want to configure a CRL endpoint for actively revoking your intermediate certs you will also need to do that here.
[ v3_intermediate_ca ]
# Extensions for a typical intermediate CA (`man x509v3_config`).
subjectKeyIdentifier = hash
authorityKeyIdentifier = keyid:always,issuer
basicConstraints = critical, CA:true, pathlen:0
keyUsage = critical, digitalSignature, cRLSign, keyCertSign
#crlDistributionPoints = URI:http address to CRL in DER or PEM format
Now that our root is configured let’s create it!
For our certificates we will use the elliptical curve algorithms since they are faster (at least on modern platforms) and are much shorter in file size when comparing to an RSA 4096 key and cert.
secp384r1 curve for our root and our intermediates. This curve is comparable to an RSA 4096 key in security. Don’t worry, we can sign client and server certs with a smaller curve later.To generate an ECDSA key we can use openssl ecparam -curve secp384r1 -genkey but this will generate a key that is not encrypted. Since this is our root key we definitely want to encrypt it.
openssl ecparam -curve secp384r1 -genkey | openssl ec -aes256 -out private/ca.key
chmod 400 private/ca.key
This will generate the key and ask you for a password to encrypt it and then store it on disk. The second command will just modify the file permissions so that it can only be read.
Now that we have the key we can generate a Certificate Signing Request (CSR) and sign it by ourselves resulting in our root certificate. The command below will do just that with a certificate that will last for 69 years.
openssl req -config openssl.cnf \
    -key private/ca.key \
    -new -x509 -days 25202 -sha256 -extensions v3_ca \
    -out certs/ca.pem

chmod 444 certs/ca.pem
The last command will just modify the file permissions to allow anyone to read our root cert.
We can also print the metadata of our cert and check if we used the correct algorithm, if the cert expires in 69 years, and if we typed our subject information correctly. If you made a mistake now is the time to correct it. If we established a chain of trust we cannot make changes to our upstream certs anymore!
openssl x509 -noout -text -in certs/ca.pem
Now that our root is setup and active we can setup our 1st intermediate signing authority. An intermediate is just a certificate authority that has been approved by a root CA and is allowed to sign other certificates. They have more abilities and expire more quickly.
To setup our intermediate we first need to change our working directory to our intermediate directory we created earlier. In here we can just copy over our openssl.cnf or copy it with wget.
cd /root/ca/intermediate
cp ../openssl.cnf ./
# OR
wget -O openssl.cnf https://derlev.xyz/blog/2024/homelab-pki/files/intermediate-openssl.cnf
If you copied your root CA config you will need to change these values:
[ CA_default ]
dir             = /root/ca/intermediate
private_key     = $dir/private/intermediate.key
certificate     = $dir/certs/intermediate.pem
crl             = $dir/crl/intermediate.crl.pem
policy          = policy_loose
Now we just need to do the entire key creation dance again but this time for our intermediate. Use a strong password for the key and more importantly a vastly different one from the one you used for your root key.
openssl ecparam -curve secp384r1 -genkey | openssl ec -aes256 -out private/intermediate.key
chmod 400 private/intermediate.key
Now we don’t self sign our certificate, we create a CSR that we then sign with our root certificate and key, creating a chain of trust.
openssl.cnf. The second command for singing the request wil use the root’s openssl.cnf.cd /root/ca
openssl req -config intermediate/openssl.cnf -new -sha256 \
-key intermediate/private/intermediate.key \
-out intermediate/csr/intermediate.csrNow we can sign that CSR with our root. This will return a valid certificate that will expire in 10 years.
openssl ca -config openssl.cnf -extensions v3_intermediate_ca \
    -days 3652 -notext -md sha256 \
    -in intermediate/csr/intermediate.csr \
    -out intermediate/certs/intermediate.pem
chmod 444 intermediate/certs/intermediate.pem
The second command again modifies the certs file permissions so that anyone can read it.
We can again verify that we created the certificate with the correct subject and other params and that it is in fact signed and trusted by our root.
openssl x509 -noout -text \
    -in intermediate/certs/intermediate.pem

openssl verify -CAfile certs/ca.cert.pem \
    intermediate/certs/intermediate.pem
If the second command does not return OK stop right here and redo your intermediate. Maybe you missed a step.
Now we can create the root intermediate chain file. This is just a file with both the intermediate and root certificate inside so that a client receiving it can instantly reference the chain of trust.
cat intermediate/certs/intermediate.pem \
    certs/ca.pem > intermediate/certs/ca-chain.pem
chmod 444 intermediate/certs/ca-chain.pem
It is best practice to use a Certificate Revocation List (CRL) for your certificates, especially your intermediates. Right now if our intermediate was compromised we have no way of telling users and servers, that certificates signed by this intermediate are not trusted by us, the root.
To set up a CRL for our intermediates we need to uncomment the following line in our root CA’s openssl.cnf to append the URL for our CRL to the certificate. This field cannot be removed by the subject afterwards since this would invalidate the checksum and therefore the certificate.
[ v3_intermediate_ca ]
# ...
crlDistributionPoints = URI:http://pki-ca.dmz.vlan.party/crls/root.crl
In here we need to supply a valid HTTP URL where our CRL is hosted. A quick and dirty way to do this is with an nginx server on our CA machine.
Install nginx on the machine with apt install nginx. You now have a simple web server on port 80. The content of the server is located in /var/www/html. In here we will put our CRL so it can be downloaded by clients and servers.
First we need to generate our CRL.
openssl ca -config openssl.cnf \
    -gencrl -out crl/root.crl.pem
We can then convert it to DER and copy it over into a separate folder on our web server.
openssl crl -inform PEM -in crl/ca.crl.pem \
    -outform DER -out crl/ca.crl
mkdir /var/www/html/crls
cp crl/ca.crl /var/www/html/crls
Now the CRL is hosted on our web server and the validity of our intermediates can be verified. Keep in mind that by default the CRL expires in 30 days.
A bad way of automating the renewal of the CRL is to use a systemd timer. Well not the timer is bad but the way I made it work.
First we create a bash script which will do the generation, converting, and copying.
#!/bin/bash

echo "Generating new crl in PEM format..."

openssl ca -config /root/ca/openssl.cnf \
  -gencrl -out /root/ca/crl/ca.crl.pem \
  -passin file:/root/ca/private/ca.pass

echo "Done!"
echo -e "\nConverting PEM to DER..."

openssl crl -inform PEM -in /root/ca/crl/ca.crl.pem \
  -outform DER -out /root/ca/crl/ca.crl

echo "Done!"
echo -e "\nCopying DER crl to webserver..."

cp /root/ca/crl/ca.crl /var/www/html/crls

echo "Done!"
echo -e "\nEverything done!"
echo -e "\nInfo about crl:\n\n"

openssl crl -in /root/ca/crl/ca.crl -noout -text

echo ""
We can then create the unit file and timer in systemd under /etc/systemd/system.
[Unit]
Description=Update CA crl every 10 days

[Service]
Type=oneshot
User=root
Group=root
ExecStart=/root/ca/update_crl.sh

[Install]
WantedBy=multi-user.target[Unit]
Description=Regen the CA crl every 10 days
[Timer]
Unit=crlgen.service
OnCalendar=*-*-01,11,21 06:00
[Install]
WantedBy=multi-user.targetNow the CRL will be regenerated every 10 days.
The only thing left is to revoke a certificate.
openssl ca -config openssl.cnf \
    -revoke intermediate/certs/intermediate.pem
https://www.apalrd.net/posts/2023/network_acme/
Now that we have a root CA and an intermediate we can use those to issue certificates. The best way to issue certificates is to use something like Smallstep. Although Smallstep offers a managed service they also maintain an open source toolbox with step-cli and step-ca.
First we need to install step-cli and step-ca on the CA server.
# step cli
wget https://dl.smallstep.com/gh-release/cli/gh-release-header/v0.26.1/step-cli_0.26.1_amd64.deb

# step ca
wget https://dl.smallstep.com/gh-release/certificates/gh-release-header/v0.26.1/step-ca_0.26.1_amd64.deb

apt install -y ./*.deb

rm ./*.deb
We now have to create our step-ca directory where we configure smallstep and put our certificates and keys. We will create a separate user for Smallstep so that it is isolated from our root user where all of our sensitive CA files are stored.
mkdir -p /etc/step
export STEPPATH=/etc/step
# Create the step user and lock its unset password
useradd step
passwd -l step
To make it easier for us we can append the following line to the root’s .bashrc so we never have to remember to set the STEPPATH variable.
export STEPPATH=/etc/stepNow we can create the step-ca config. Smallstep has an init command we can use for that.
# Replace the dns name to match yours (I am using my localdomain hostname) and replace the provisioner name
step ca init --name="PKI-CA" --dns="pki-ca.dmz.vlan.party" --address=":443" --provisioner="derlev" --deployment-type="standalone"
This command will generate an entirely new CA with root and intermediate which we don’t want. But the nice thing is that it generates all the files we need. Consequently we now need to replace the root cert and intermediate cert and key with the ones we generated with openssl.
cp /root/ca/certs/ca.pem /etc/step/certs/root_ca.crt
cp /root/ca/intermediate/certs/intermediate.pem /etc/step/certs/intermediate_ca.crt
chmod 400 /etc/step/certs/*
cp /root/ca/intermediate/private/intermediate.key /etc/step/secrets/intermediate_ca_key
chmod 400 /etc/step/secrets/*
rm /etc/step/secrets/root_ca_key

chown -R step:step /etc/step
We also need to reconfigure our step-cli with the correct certificate fingerprint.
step certificate fingerprint /etc/step/certs/root_ca.crtReplace the fingerprint in /etc/step/config/defaults.json with the one returned.
{
  "ca-url": "https://pki-ca.dmz.vlan.party",
  "ca-config": "/etc/step/config/ca.json",
  "fingerprint": "6415ad78b39f6994a91f099bd328e98446fbcb008a8020e8708e1ef77e516545",
  "root": "/etc/step/certs/root_ca.crt"
}
Now we just need to setup a systemd service for the step-ca server to run in the background and then we can finally issue certificates using ACME.
First we need to add a file with our intermediate key’s password. This is needed because step-ca obviously needs to sign certificates with the intermediate’s key.
echo "YOUR KEY PASS HERE" > /etc/step/secrets/intermediate_password
chmod 400 /etc/step/secrets/intermediate_password
chown step:step /etc/step/secrets/intermediate_password
Then we can create the systemd unit file under /etc/systemd/system/.
[Unit]
Description=Smallstep Certificate Authority

[Service]
User=step
Group=step
Environment="STEPPATH=/etc/step"
ExecStart=/usr/bin/step-ca /etc/step/config/ca.json --password-file=/etc/step/secrets/intermediate_password

[Install]
WantedBy=multi-user.target
But before we can activate our service we have to add the CAP_NET_BIND_SERVICE capability which allows step-ca to bind to ports lower than 1024 (we need 443).
setcap CAP_NET_BIND_SERVICE=+eip /usr/bin/step-caNow we can reload the systemd daemon and enable our service.
systemctl reload-daemon
systemctl enable step-ca.service --now
Now our step-ca server should be available and listening for requests.
Right now if we had a TLS certificate presented to us by a web server our browser would deny the connection because the root certificate is not in the trusted certificates store of the machine and therefore not trusted by the machine’s admin. To fix that we need to import the root certificate into the device’s trusted store.
We need to get the certificate from the Smallstep server, ignoring the invalid cert error, and put it into /usr/local/share/ca-certificates where all additional root certs live.
wget --no-check-certificate https://pki-ca.dmz.vlan.party/roots.pem -O /usr/local/share/ca-certificates/pki-ca.crt
update-ca-certificates
The second command updates the trusted store. To validate that this operation worked we can just curl our Smallstep server.
curl https://pki-ca.dmz.vlan.partyIf the output is just 404: Not Found then the certificate was validated with the root cert in the trusted store. Otherwise cURL would return an error that the certificate could not be validated.
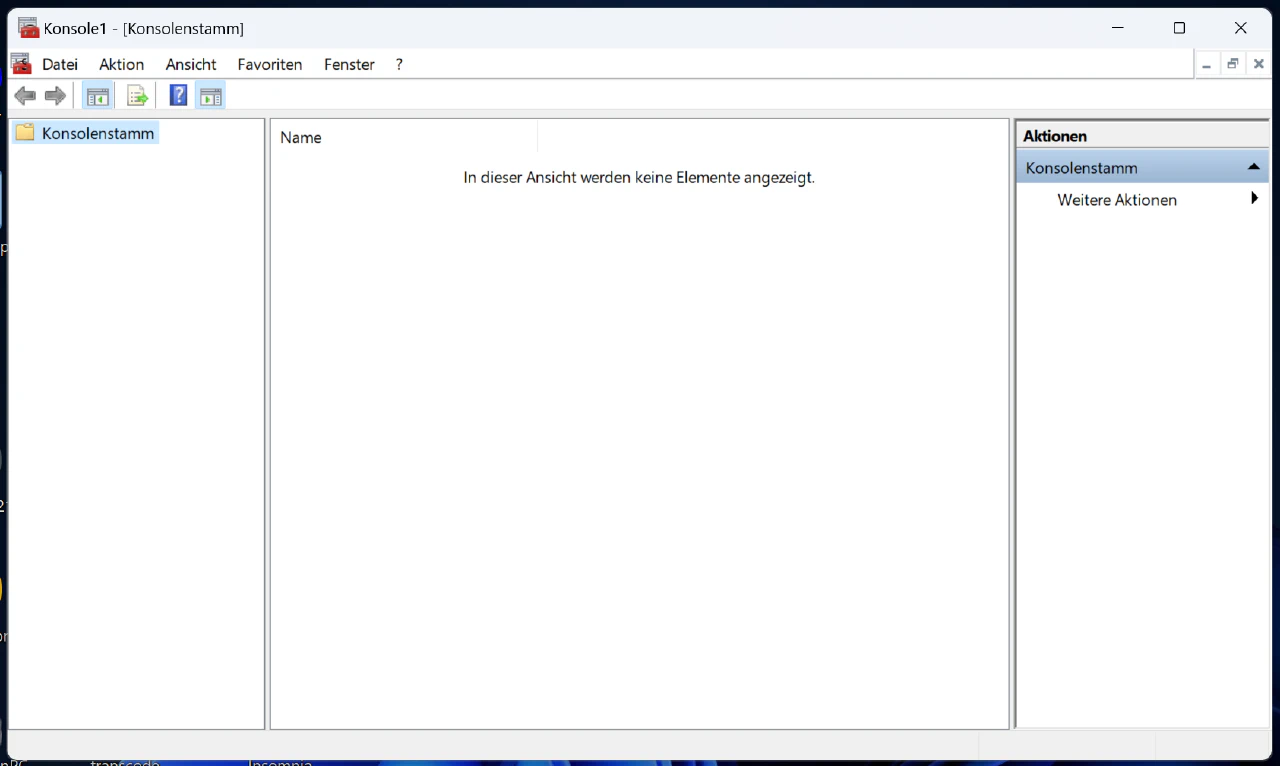
To get to the machine’s trusted store you will need to open a Run box and enter mmc.exe.

This will open the Microsoft Management Console, after you gave it elevated privileges.
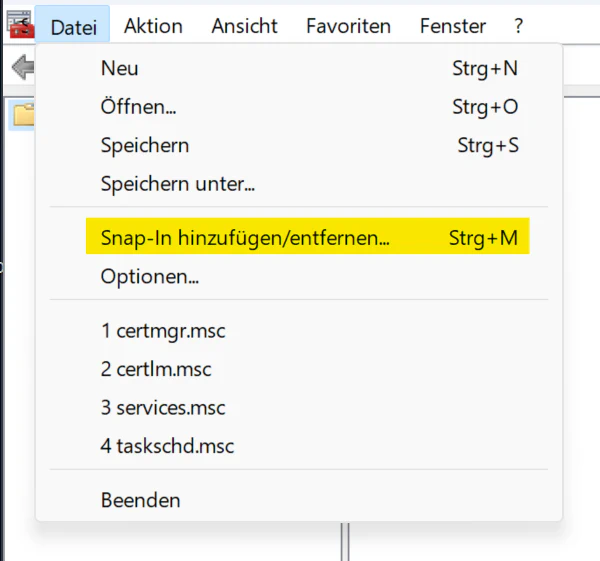
In here you will need to add a SnapIn under File > Add or remove SnapIns....
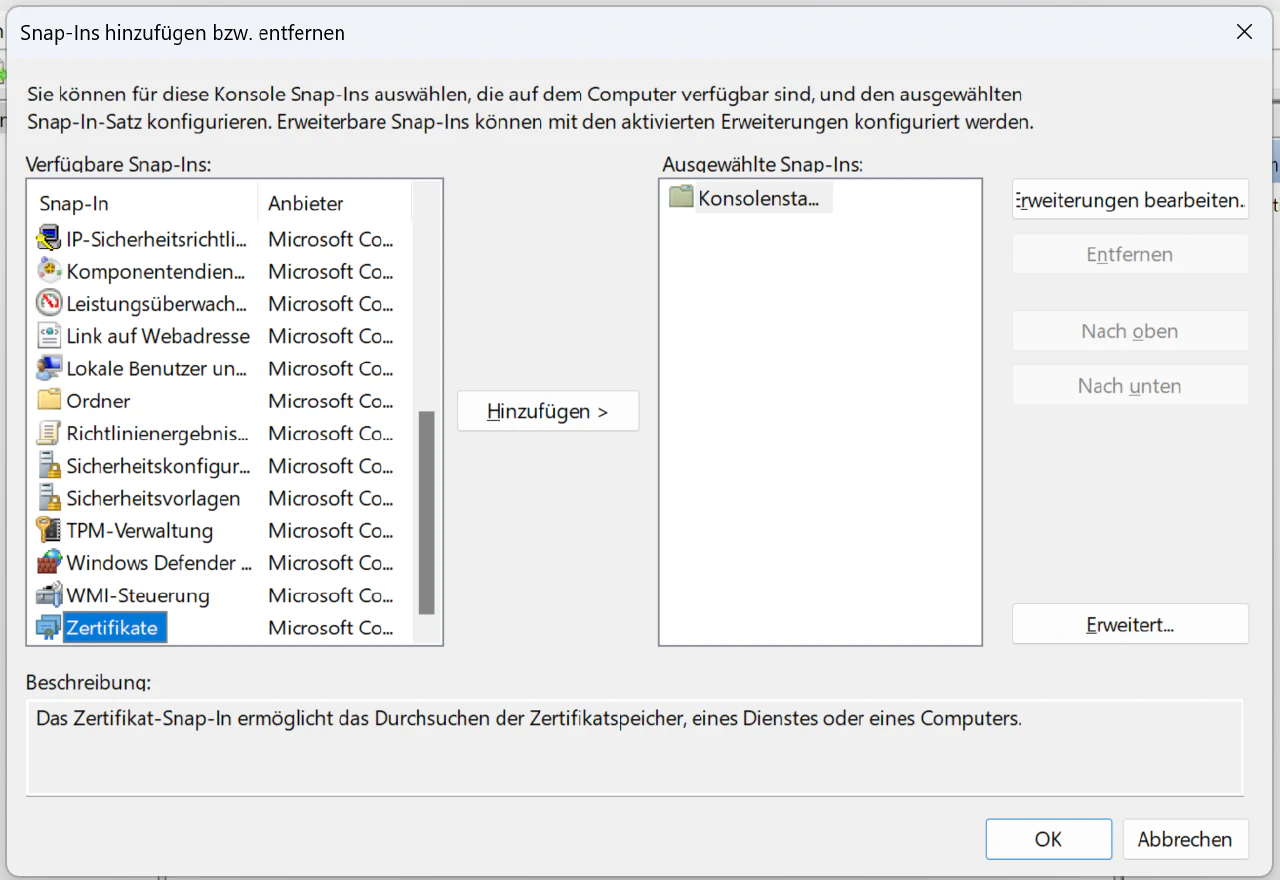
In the newly opened window search for the Certificates SnapIn and add it by clicking Add >. The SnapIns are sorted in alphabetical order so on English systems it will be near to the top.
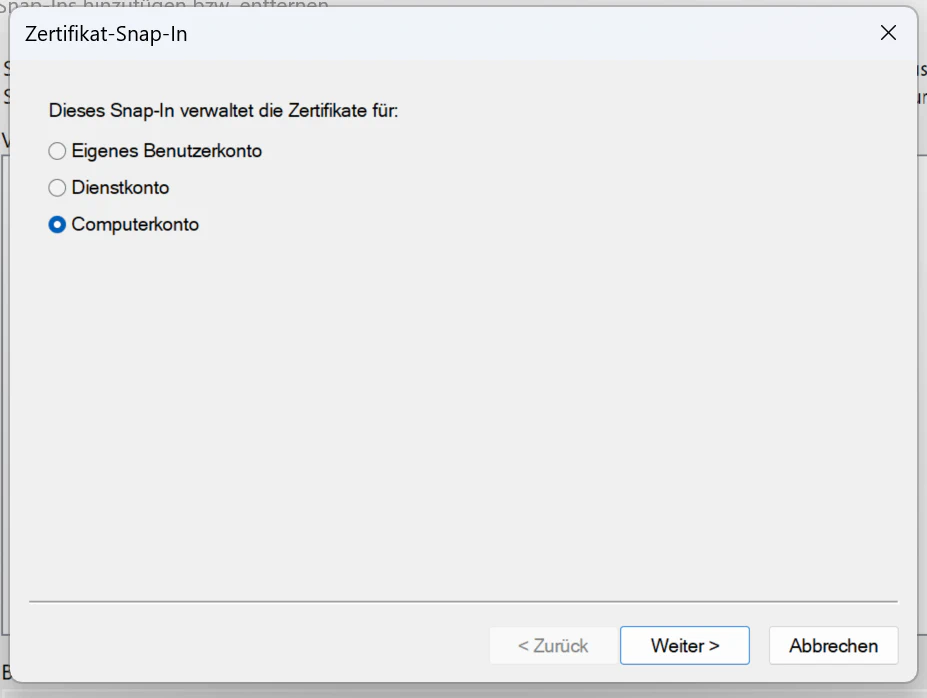
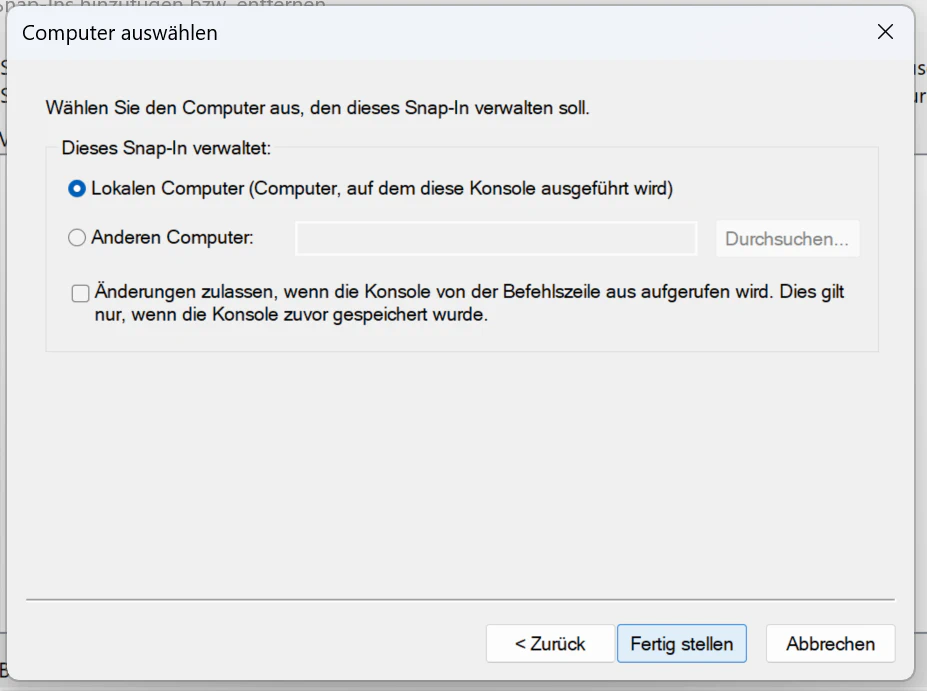
Another window will pop up where you will need to select Computeraccount and Local Computer. Then click OK in the Add or remove SnapIns window.
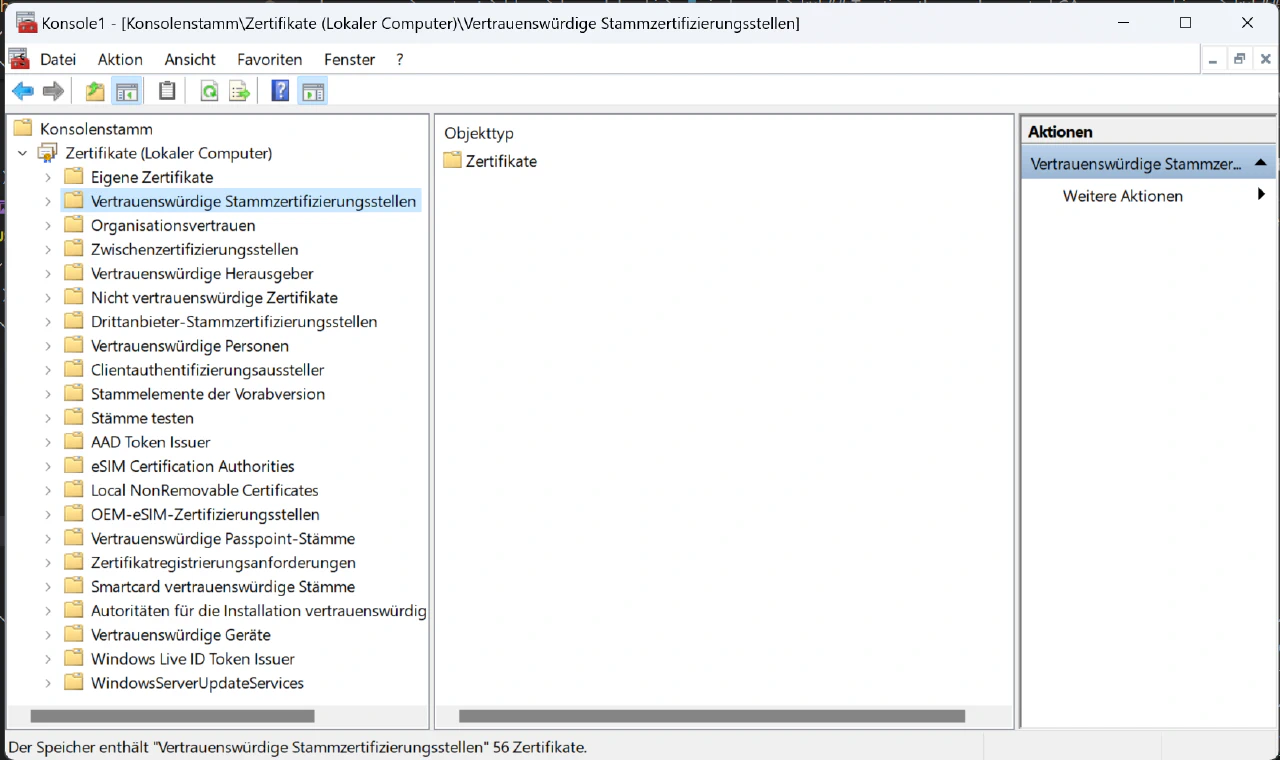
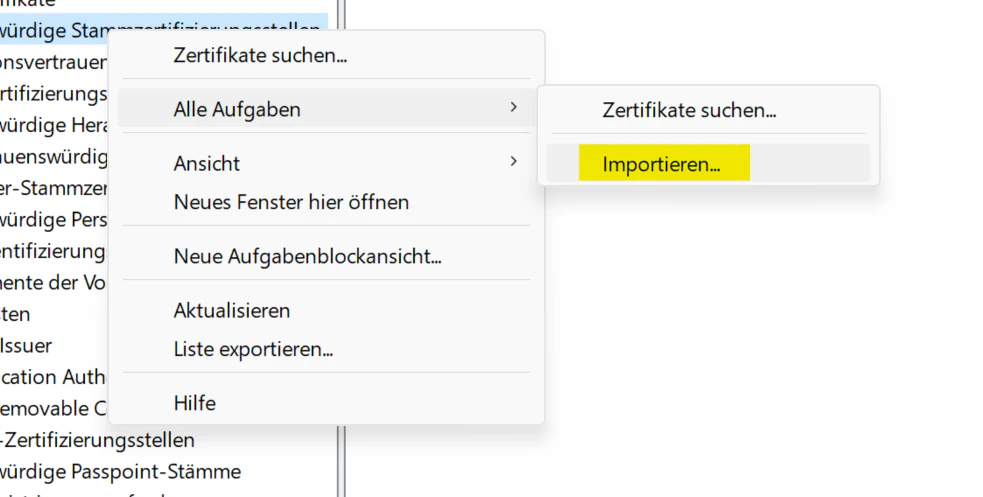
If you now expand the Certificates item in the MMC you will see the Trusted Root Certification Authorities item. Right click on that and under All tasks click Import. Follow the import dialog and after finishing you can now access websites with certificates signed by your ca.
On Apple devices importing a root certificate is quite easy.
- Visit the Smallstep server’s
roots.pemURL (https://pki-ca.dmz.vlan.party/roots.pem) with Safari - Skip the untrusted root CA prompt
- Allow the site to add a configuration profile
- Go into the settings app, the config profile will be right at the top (
Loaded Profiles) - Install the profile
After you have gone through these steps the certificate is installed but not yet fully trusted. You will need to go to Settings > General > About > Certificate Trust Settings. Here you will find your root certificate. Just enable full trust for the certificate and you’re done.
Now that we have established trust towards our CA we can start to use it. We can now request a certificate with ACME for our Traefik instance.
But before we can do that we have to add an ACME provisioner in Smallstep. To do that we have to log back into our machine running Smallstep and switch users to root.
step ca provisioner add acme-z9w4d11j --type ACME --challenge http-01 --challenge dns-01 --challenge tls-alpn-01 --admin-name derlev
systemctl restart step-ca.service
This will add the ACME provisioner acme-z9w4d11j to our Smallstep server which only accepts the http-01, dns-01, and tls-alpn-01 challenges. It is generally best practice to randomize either parts of the provisioner’s name or the entire name to avoid people from acquiring certificates that should have no access to one. This becomes more important when we configure device-attest-01 later on, where a certificate can (depending on your setup) give a device access to our home WiFi.
Now we can truly configure Traefik to use our Smallstep server. To do that we need to edit the traefik.yml file where our certificate resolvers are defined. If you are using Traefik in your Kubernetes cluster you will need to lookup on how to configure a cert resolver.
# ...
certificatesResolvers:
  smallstep:
    acme:
      email: hi@derlev.xyz
      storage: acme.json
      dnsChallenge:
        provider: cloudflare
        resolvers:
          - "1.1.1.1:53"
          - "1.0.0.1:53"
      caServer: https://pki-ca.dmz.vlan.party/acme/acme-z9w4d11j/directory
      certificatesDuration: 24
      keyType: EC256
With this configuration we define our ACME server, how long a certificate is valid, what key type we want to receive, and that we are using the dns-01 challenge type with Cloudflare.
With that configured we can now request a certificate for our Traefik instance. Here’s an example using container labels on the Traefik container itself.
# ...
    environment:
      - CF_DNS_API_TOKEN=your_cf_api_token
    labels:
      # ...
      - "traefik.http.routers.traefik-secure.tls=true"
      - "traefik.http.routers.traefik-secure.tls.certresolver=smallstep"
      - "traefik.http.routers.traefik-secure.tls.domains[0].main=dmz.vlan.party"
      - "traefik.http.routers.traefik-secure.tls.domains[0].sans=*.dmz.vlan.party"
This config will get a certificate that is valid for all subdomains of dmz.vlan.party as I use Traefik for routing my internal services. Traefik will then automatically apply this certificate to where it can fit one of the listed domain names.
Using a custom ACME CA with Caddy is very simple. You will just need to add the acme_ca directive with the ACME URL from Smallstep in the global config and that’s it. Ofcourse your machine needs to have the root’s cert installed but Caddy will then just request a certificate from Smallstep with the http-01 challenge and serve your website over HTTPS.
{
  acme_ca https://pki-ca.dmz.vlan.party/acme/acme-z9w4d11j/directory
}

your-domain.dmz.vlan.party {
  # your caddy config
}
But issuing certificates to servers is not the only thing a CA can do. Client certificates for users and devices can be used to identify and authenticate said users and devices. This is useful for EAP-TLS WiFi security where the WiFi password is the certificate or authentication with mTLS where a web server can authenticate a user with their client certificate eliminating the need for passwords.
One way of distributing a client certificate is through a PKCS#12 (short: P12) file which is essentially a zip or tar file with a certificate, a key, and a certificate of the creator/signer. I am using this method to distribute client certificates to Android devices.
To create a P12 file we first need a certificate and a key. We can easily generate a pair with Smallstep. We can install the step-cli on our local machine and remotely do these tasks.
https://smallstep.com/docs/step-cli/reference/ca/
# assuming you have step-cli already installed
step ca bootstrap --ca-url https://pki-ca.dmz.vlan.party --fingerprint 6415ad78b39f6994a91f099bd328e98446fbcb008a8020e8708e1ef77e516545

# after the step ca is configured we can use it remotely
step ca certificate "My Android Phone" phone.crt phone.key
After selecting your admin provisioner and entering your password you will have a phone.crt and phone.key in your working directory. We can use those to create a P12 file but we will also need the ca-chain.pem from our intermediate ca. How you transport that file is up to you. You can just cat it out on the CA server and paste the contents into a file on your local machine or you can put it into the directory of the nginx server we created. Note that the nginx server runs on port 80, so you will have to specify http:// instead of https://.
With the key, cert, and chain files creating a P12 goes as follows:
openssl pkcs12 -export -inkey phone.key -in phone.crt -certfile ca-chain.pem -out phone.p12Openssl will ask you to enter a passphrase for the P12 file. It is highly recommended to use one since your P12 file will travel through the internet (by email or on a web server).
As mentioned above iOS/iPadOS requires a passphrase for P12 files.
For those devices you will also need to append the -legacy flag to the openssl command since Apple seems to have skipped on adding support for newer formats/encryption algorithms of P12 files.
Installing a P12 file is as simple as tapping on it, and in the case of Android specifying its purpose (either VPN & Client auth or WiFi auth), and going through the prompts. In the case of Android this will automatically add the contained root certificate to the trusted roots.
On Windows 11 we can create a key in the TPM installed in the PC. This will prevent anyone from obtaining the private key since the signing with the key takes place on the TPM itself.
To obtain a certificate we need to create a private key and a CSR so that the intermediate can sign us a certificate. For creating the CSR and importing the certificate we will use the CLI tool certreq. In order to tell certreq what to do we need to create a config file.
[NewRequest]
Subject = "CN=My Desktop"
FriendlyName = "My Desktop"
HashAlgorithm = SHA256
KeyAlgorithm = ECDSA_P384
KeyLength = 384
Exportable = FALSE
ProviderName = "Microsoft Platform Crypto Provider"
MachineKeySet = FALSE
KeyUsage = CERT_DIGITAL_SIGNATURE_KEY_USAGE | CERT_KEY_ENCIPHERMENT_KEY_USAGE
This will generate a key for the user on the TPM with the ECDSA P384 algorithm and request a certificate with the common name My Desktop which needs to be able to do digital signing and encrypting/decrypting (things you need to do when doing mTLS/client auth).
With the following command we generate the key and CSR which we then need to sign with our intermediate.
certreq -new desktop-certreq.inf desktop.csrWith the CSR we can issue a certificate with Smallstep.
step ca sign desktop.csr desktop.crtAnd import that cert into the Windows Certificates Store with certreq.
certreq -accept -user dekstop.crtThe user flag is important. This will import the cert into the user’s cert store so that it can be used by browsers and other applications for mTLS.
On Apple devices we can make use of two things. We can use the ACME device-attest-01 challenge type to request a certificate stored in the Secure Enclave and we can use Apple’s .mobileconfig files to define the certificate and challenge.
To use ACME device-attest-01 we will need to create a new provisioner in our Smallstep step-ca. To do that we need to log into the CA machine and switch users to root.
step ca provisioner add apple-afpl541u --type ACME --challenge device-attest-01 --admin-name derlev
systemctl restart step-ca.service
Then we need to create our .mobileconfig file. A .mobileconfig is just an XML file which can do various things on Apple devices such as configuring an ACME device attestation request.
<!DOCTYPE plist PUBLIC "-//Apple//DTD PLIST 1.0//EN" "http://www.apple.com/DTDs/PropertyList-1.0.dtd">
<plist version="1.0">
<dict>
  <key>PayloadContent</key>
  <array>
    <dict>
    <key>Attest</key>
    <true/>
    <!--
          ClientIdentifier must match one of the permanent identifiers returned by Apple as part of the
          device attestation (Serial Number, UDID)
        -->
    <key>ClientIdentifier</key>
    <string>iPad Serial Number</string>
    <!--
          Update the DirectoryURL with the base URL for your step-ca instance and name of your ACME provisioner.
          i.e: https://ca.example.com/acme/provisioner/directory
        -->
    <key>DirectoryURL</key>
    <string>https://pki-ca.dmz.vlan.party/acme/apple-afpl541u/directory</string>
    <key>HardwareBound</key>
    <true/>
    <key>KeySize</key>
    <integer>384</integer>
    <key>KeyType</key>
    <string>ECSECPrimeRandom</string>
    <key>PayloadDisplayName</key>
    <string>ACME Certificate</string>
    <key>PayloadIdentifier</key>
    <string>party.vlan.apple-acme-payload</string>
    <key>PayloadType</key>
    <string>com.apple.security.acme</string>
    <key>PayloadUUID</key>
    <string>55af6cdf-7083-48e0-9a39-f34ca009ac50</string>
    <key>PayloadVersion</key>
    <integer>1</integer>
    <!--
          Your certificate Subject common name (CN) has to match the permanent identifier supplied in ClientIdentifier above.
        -->
    <key>Subject</key>
    <array>
      <array>
      <array>
        <string>CN</string>
        <string>iPad Serial Number</string>
      </array>
      </array>
    </array>
    </dict>
  </array>
  <key>PayloadDisplayName</key>
  <string>ACME device attest device certificate</string>
  <key>PayloadIdentifier</key>
  <string>party.vlan.apple-acme-profile</string>
  <key>PayloadScope</key>
  <string>System</string>
  <key>PayloadType</key>
  <string>Configuration</string>
  <key>PayloadUUID</key>
  <string>be260c4b-0329-400f-8b17-f5000ec9e8e0</string>
  <key>PayloadVersion</key>
  <integer>1</integer>
  <key>PayloadDescription</key>
  <string>ACME device-attest-01 for a certificate in Secure Enclave used for mTLS in PKI</string>
  <key>PayloadOrganization</key>
  <string>vlan.party</string>
</dict>
</plist>
This .mobileconfig can be loaded onto an iPhone, iPad, iPod, or a macOS device as is. But it will be “untrusted” and be plastered with warnings.
To circumvent that we can sign the file with openssl. You will need to create a certificate and key with Smallstep for signing your .mobileconfig files which I will omit.
openssl smime -sign -signer signer.crt -inkey signer.key -certfile ca-chain.pem -nodetach -outform der -in ipad.mobileconfig -out ipad-signed.mobileconfigThe resulting .mobileconfig file will be trusted by iOS/iPadOS/macOS als long as you imported the root certificate beforehand.
If you install this profile the device will instantly generate a key in the Secure Enclave and go out to the Smallstep server to request a valid certificate. The device will prove its genuinity with a signed certificate by Apple containing its serial number and other identifiers. The Smallstep server can validate the certificate and sign the CSR returning a valid device certificate which the device can then use to authenticate to web services or login to the WiFi.
Now that we have spend all this time and effort on configuring certificates, servers, services, and devices we can finally use our CA to its full potential. Setting up mTLS on Traefik to authenticate clients is pretty straight forward. We just need to import the root and intermediate certificates into the Traefik container and write the following to our file config provider (mine is set to config.yml):
tls:
  options:
    mtls:
      clientAuth:
        caFiles:
          - "/certs/root.crt"
          - "/certs/intermediate.crt"
        clientAuthType: RequireAndVerifyClientCert

# ...
Then we can reference these tls options on any router. Here’s an example with container labels.
    labels:
    # ...
      - "traefik.http.routers.traefik-secure.tls.options=mtls@file"
    # ...
And with this config Traefik will request a certificate from the client when accessing this service. Most browsers will automatically select the right certificate and just prompt you to click OK.
You might have wondered why we also need to include the intermediate certificate. Somehow Apple iOS/iPadOS devices cannot ‘connect the dots’ and fail to associate their device certificate with the root CA’s certificate. That’s why we need to include the intermediate as Traefik sends a list of valid certificates to the client from which it then has to select the right client cert from its certificate store which will fulfill the chain of trust for one of the certificates sent by Traefik.
And with that this pretty lengthy guide has come to an end.
You did it 🎉
Now you should have your own private certificate authority from which you can issue server and client certificates for better and easier authentication from clients to servers and vice versa.